
Gorgeous Anubias Types: Care, Maintenance, and Aquascaping Tips
Introduction
Among the handful of “set-and-forget” plants in my tanks, anubias types are the ones I recommend to new hobbyists and to veterans who want dependable greenery. These rugged aroids bring texture and architectural interest without demanding constant fuss. In this article I’ll walk you through the care basics, surprising species differences, practical maintenance routines, and creative placement ideas I use in my own aquascapes. Expect specific tips, unusual facts, and actionable troubleshooting so your Anubias thrive for years.
Anubias Types: Overview and Unique Traits
There are many cultivars and species lumped under the common name Anubias, and each variety has its own personality. The classic Anubias barteri var. nana is compact and slow-growing, ideal for foregrounds and even miniature tanks. Larger kinds, like Anubias congensis or Anubias gigantea, carry longer petioles and broader leaves that make dramatic focal points attached to driftwood. A few cultivars—like the golden or variegated forms—are prized for irregular coloring that adds contrast in low-light setups.
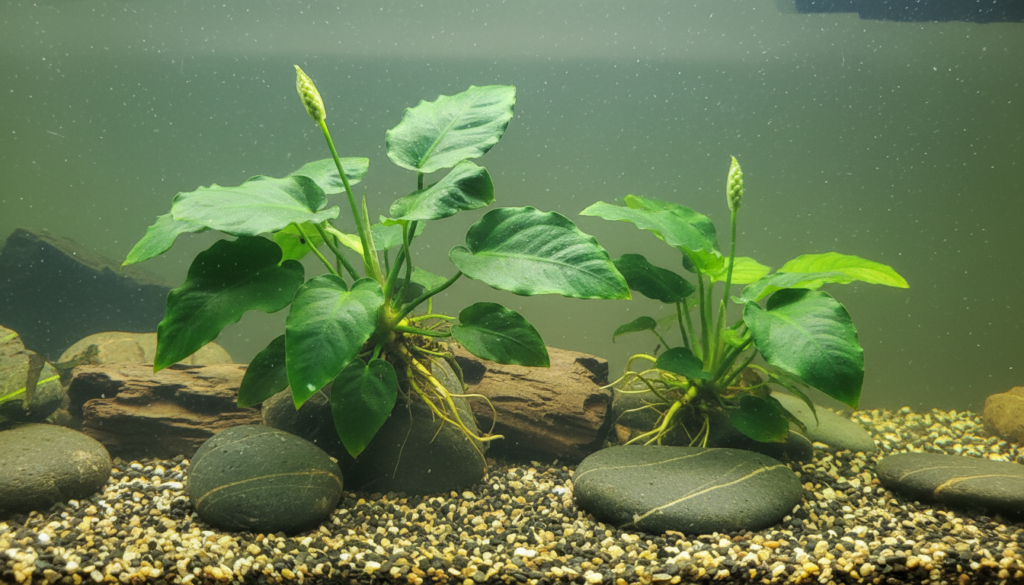
An unusual fact: Anubias are true aroids and will occasionally produce a tiny spadix (flower) in aquariums, often just at the water surface or when a leaf rises above the waterline. In nature those flowers are pollinated by small insects, which is why you’ll sometimes see them abort when fully submerged. Another point many people miss is how these plants evolved to cling to roots and rocks; the rhizome is the plant’s heart. Burying it will often lead to rot, so think of the rhizome as a wristwatch you mustn’t shove under sand.
Anubias Types in the Aquarium: Placement and Care
Placement is half the battle. Because anubias types prefer shade, I attach them to wood, stone, or slate placed where cast shadows fall. They tolerate lower light than most stem plants and generally prefer temperatures between 72–82°F (22–28°C) and a pH range of 6.0–7.8. Growth is slow but steady under stable conditions, and patience is rewarded—those thick leaves can outlast several tankmates.
- Attachment: Use fishing line, cotton thread, or aquarium-safe glue to tie rhizomes to wood or rock until roots take hold.
- Do not bury: Never bury the rhizome in substrate; leave it exposed or rest it on a rock.
- Water movement: Moderate flow helps keep leaves clean and discourages algae spots.
Lighting, Nutrients, and Growth Rates
Light is where hobbyists often trip up. Too much light invites algae onto Anubias leaves; too little leaves them pale and slow-growing. I aim for low-to-moderate illumination—enough to see the leaf texture without coaxing rapid growth. Liquid fertilizers are more useful than root tabs for anubias types because these plants absorb nutrients through leaves and roots; a balanced micronutrient supplement weekly is my routine. CO2 speeds growth but is not required; I rarely add CO2 to tanks where Anubias are the primary plants.
Tip: If you see small brownish or green film on the leaves after moving a new Anubias into a brighter tank, it’s usually diatoms or cyanobacteria; reduce light for a few days and perform frequent water changes. The plant will rebound.
Propagation and Rapid Troubleshooting
Propagating Anubias is simple and satisfying. Use a sharp, clean blade to cut the rhizome into sections, ensuring each piece has at least two leaves and some roots. I prefer to leave trimmed pieces attached to wood until the new roots anchor; this avoids losing small fragments to the current. Another quick method is to remove older leaves and encourage new growth; a healthy rhizome will continue producing shoots if the aquarium environment is stable.
Rhizome rot is the most feared problem. It starts with mushy tissue and spreads; if you catch it early, cut back to healthy white tissue and reattach the remainder to clean wood. Increasing water flow and raising the water temperature slightly can slow the rot, but severe cases are often lost. Preventative care—keeping the rhizome out of substrate and maintaining good water quality—goes a long way.
Substrate, Tankmates, and Long-Term Maintenance
Substrate matters less for anubias types than for many plants. They do not require nutrient-rich substrate because their rhizome absorbs little from it. However, positioning matters: place Anubias where fish won’t dig and where snails or herbivores won’t feast on new leaves. I’ve kept Anubias with corydoras and tetras for years without issue; larger herbivores like goldfish may gnaw new shoots, so choose tankmates carefully.
- Cleaning: Gently wipe stubborn algae with a soft toothbrush during water changes.
- Pruning: Remove old leaves at the base; this promotes new shoots without stressing the rhizome.
- Repositioning: On occasion I reattach Anubias to a new piece of wood to change the scape—rootlets adapt quickly.
Creative Uses and Aquascaping Ideas
One of my favorite tricks is creating a “moss wall” by alternating strips of Anubias and moss on vertical wood—this provides layered textures and a sense of depth. Small anubias types make excellent foreground accents on rocks, while larger species can serve as midground anchors behind a school of fish. Because they’re resilient, I sometimes use Anubias as temporary starter plants in new aquariums to establish a biological presence that trains grazing fish away from more delicate species.
Unusual fact: some aquascapers train Anubias to grow upwards by periodically tying a small weight to the rhizome so new leaves stand erect. It looks striking in Iwagumi-style layouts when done subtly.
Common Problems and How to Fix Them
Algae is the top complaint, followed by slow growth and rhizome rot. For algae, reduce light and add gentle flow; introducing algae-eaters like Amano shrimp or nerite snails often helps. If leaves are turning translucent and dying, check for rhizome burial or poor water flow; if a rhizome has been buried, gently unearth it and trim away dead tissue. For nutrient deficiencies I use a trace element blend and monitor leaf coloration—pale leaves often respond quickly to iron and potassium dosing.
Frequently Asked Questions
Q1: How do I attach an Anubias to driftwood?
A1: Position the rhizome on the wood, tie with thread or line, and wait for roots to form. After a few weeks the tie can be removed. Some hobbyists use superglue gel for immediate adhesion—apply sparingly and ensure the glue is fully cured before returning the plant to water.
Q2: Can Anubias be planted in substrate?
A2: The rhizome should never be buried. You can plant the roots in substrate as long as the rhizome remains exposed. Many gardeners prefer to leave the plant unattached on a rock or tied to wood for the healthiest growth.
Q3: Will Anubias survive high light?
A3: Yes, but with caveats. Under intense light anubias types are more prone to algae and may develop burnt-looking new leaves. If you must use higher light, pair with fast-growing stem plants and maintain strong CO2 and nutrient levels to outcompete algae.
Q4: How fast do Anubias grow?
A4: Growth is slow to moderate—often a few new leaves per month in smaller varieties and slightly faster in larger ones if conditions are ideal. Don’t expect rapid carpets; patience gives you dense, sturdy plants.
Conclusion
Anubias types are a cornerstone of low-tech and high-tech aquascapes alike. Their forgiving nature, sculptural leaves, and compatibility with many tank inhabitants make them an essential plant in my collection. Keep the rhizome free, dial in low-to-moderate light, use liquid fertilization, and be patient—those slow-growing leaves reward long-term observation. With a few basic techniques and the occasional trim, your Anubias will become a stable, long-lived asset in the aquarium, offering texture, hiding spots, and a timeless green aesthetic.
One Comment